How to Test a Neon Starter: Step-by-Step Diagnosis
- To test a neon starter, swap it with an identical working starter: if the tube lights, the starter failed. About nine out of ten fluorescent failures start there.
- You get clear symptoms, swap and multimeter steps, starter vs tube vs ballast clues, and why LED neon needs no starter.
To test a neon starter, the most reliable method is to swap it with an identical starter that still works: if the tube lights again, the starter was the problem. A bad starter also shows up as a tube that blinks without fully lighting, or ends that glow red. At Helioneon, our custom LED neon signs run with no starter at all, but this guide shows how to test a classic neon starter, replace it, and why that part disappeared with LED.
The starter is the number-one wear part on fluorescent tubes, the “neon” lights still found in garages, kitchens, and workshops. In fact, nine out of ten failures start there, and testing it saves you from buying a whole new tube for nothing. With more than 500 LED neon signs delivered and deep expertise across the neon lighting market, we know both product generations. Here is the step-by-step diagnosis.
What does a neon starter do?
A neon starter is a small cylinder that kicks off fluorescent tube ignition: it preheats the electrodes, then sends the pulse that ionizes the gas. In plain terms, without a working starter the tube cannot start, even if it is brand new. In other words, this low-cost part controls the entire startup.
How it works also explains why it wears out. On every start, a bimetallic contact opens and closes inside the starter, a cycle that eventually fatigues it. As a result, the starter usually dies long before the tube. Note that this component belongs to the fluorescent generation: the full story of that technology is covered in our article on the history of neon signs.
- Role: preheat the electrodes and start the tube
- Location: small cylinder clipped onto the side of the fixture
- Lifespan: much shorter than the tube
- Cost: only a few dollars at a hardware store
The Wikipedia page Fluorescent lamp describes how a glow starter preheats the cathodes, then opens so the ballast can strike the arc. That start cycle is why the starter usually fails before the tube on classic fluorescent fixtures.
What are the symptoms of a bad neon starter?
A bad neon starter shows clear signs: a tube that blinks without ever lighting fully, ends that glow red, startup that gets harder and harder, or a neon that stays completely dark. Each of these points to ignition that no longer works correctly. That is why the starter is always the first suspect to check.

You still need to separate starter symptoms from tube symptoms. A tube blackened at the ends is near end of life, while an intact tube that will not start points to the starter or the ballast. A tube that buzzes loudly more often points to a tired ballast. This differential diagnosis prevents useless replacements.
- Blinking without full light: the classic dead-starter symptom
- Ends glowing red: continuous preheat, starter stuck
- Hard startup: several seconds of attempts, worn starter
- Blackened tube: the tube is failing, not the starter
How to test a neon starter step by step?
Testing a neon starter takes five minutes and needs no tools with the swap method: replace the suspect starter with an identical working one, then watch what happens. It is the most reliable test because it removes doubt without electrical measurement. In short, a second starter that costs a few dollars becomes your diagnostic part.

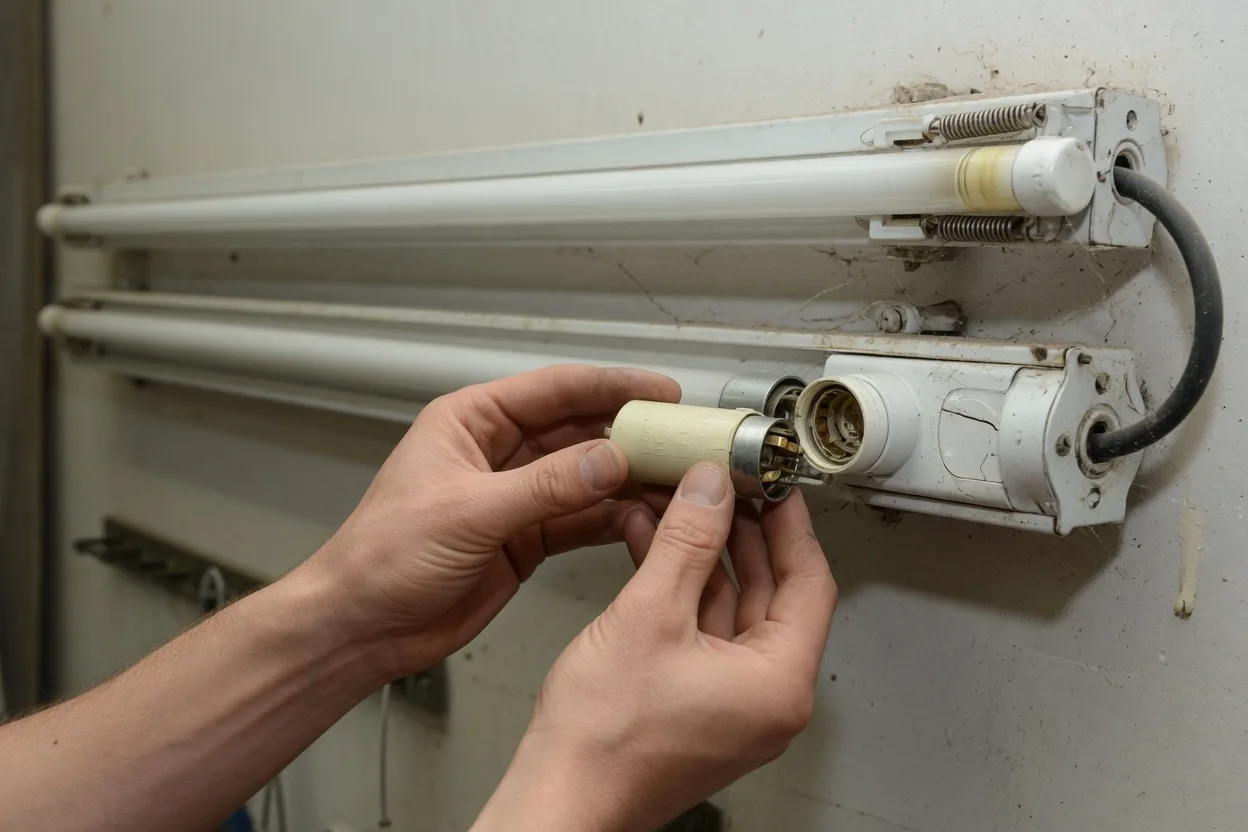
Safety frames every step. Always shut power off at the breaker before touching the fixture, because a fluorescent circuit runs on line voltage. The starter itself comes out with a quarter turn, without forcing. Here is the full procedure.
- Step 1: cut power at the breaker, not only at the wall switch
- Step 2: find the starter, the small cylinder clipped on the fixture
- Step 3: remove it with a quarter turn counterclockwise
- Step 4: insert an identical starter (same rating) that still works
- Step 5: restore power and watch: if the tube starts, the starter was dead
- Multimeter alternative: check continuity on the starter off-circuit
Is a multimeter test reliable for a starter?
A multimeter test on a neon starter gives a clue, but it is less conclusive than a swap test, because the bimetallic contact only shows its real behavior under live voltage. In practice, you measure continuity across the starter terminals: a wild reading confirms failure, but a normal reading does not guarantee it will work under load. In other words, the multimeter catches clearly dead starters, not tired ones.

That is why electricians favor a systematic swap. At the price of the part, replacing the starter at the first doubt costs less than the time spent measuring. If a new starter changes nothing, diagnosis moves to the tube, then the ballast, in that order.
- Continuity check: starter removed, probes on both pins
- Wild reading: permanent open circuit, dead starter confirmed
- Normal reading: inconclusive, the starter can still fail under voltage
- Practical rule: at the first doubt, replace it, the part costs a few dollars
Dead starter, tube, or ballast: how do you decide?
When a neon will not light, three parts can be at fault, and diagnosis runs from cheapest to most expensive: starter first, tube next, ballast last. That logic keeps you from replacing a costly part when a component that costs about three dollars is enough. The table below summarizes the clues that point to each culprit.

| Symptom | Likely culprit | Action |
|---|---|---|
| Blinks without lighting | Starter | Replace the starter |
| Glowing red ends | Stuck starter | Replace the starter |
| Tube blackened at the ends | Tube at end of life | Replace the tube |
| Loud buzzing | Tired ballast | Replace the ballast |
| Nothing after every replacement | Ballast or wiring | Call an electrician |
Note that if the tube itself is dead, replacement should go through the proper recycling channel, because fluorescent tubes contain mercury.
Why does LED neon have no starter?
LED neon runs with no starter, no ballast, and no gas: its diodes light instantly when powered, on low-voltage DC. Electroluminescence needs no ignition pulse, unlike fluorescent gas that must be ionized. As a result, the whole fragile startup mechanism disappears, and with it the top cause of failure.
That simplification changes product reliability. An LED neon reaches full brightness immediately, with no ignition flicker, and lasts 100,000 hours with no wear part to watch. Its power draw is also much lower, as detailed in our guide on LED neon sign power consumption. The full side-by-side of both generations is in our article on glass neon vs LED neon.
- Instant on: no ignition phase and no flicker
- Zero wear parts: no starter and no ballast to replace
- 100,000 hours: long life with no maintenance
- Low voltage 12V: no line-voltage circuit to handle
Should you repair an old neon or switch to LED?
Replacing a starter for about three dollars is still worth it on a recent tube, but a fluorescent neon that keeps failing signals an installation at end of cycle, where switching to LED becomes the real cost-effective move. Each service call on starter, tube, or ballast adds up while energy use stays high. In other words, endless repairs cost more than upgrading.
For décor lighting or a sign, the question barely comes up. LED neon delivers the same warm glow with no starter, no high voltage, and no upkeep, with a 3-year warranty from us. Our guide on LED neon sign lifespan puts hard numbers on the longevity gap between the two technologies.
- Recent tube failure: change the starter, a few-dollar fix
- Repeated failures: the setup is aging, consider LED
- Décor or sign use: LED is the clear choice
- Full cost view: energy + parts + time versus zero upkeep
Frequently asked questions about testing a neon starter
How do you tell if the starter or the neon is dead?
Watch the symptoms. A tube that blinks without fully lighting, or whose ends glow red nonstop, points to the starter. A tube with blackened ends is at end of life, and that is what you replace. The most reliable test is still a swap: insert an identical working starter, and if the neon restarts, the starter was at fault. If the problem remains with a new starter, try a new tube, then suspect the ballast. This diagnostic order always runs from the cheapest part to the most expensive.
How do you test a neon starter with a multimeter?
Shut power off at the breaker, remove the starter with a quarter turn, then measure continuity between its two pins with the multimeter on ohms. A permanent open circuit confirms a dead starter. Be careful though: a normal reading does not guarantee operation, because the starter’s bimetallic contact only shows its behavior under real voltage. That is why a swap test with a new identical starter remains more conclusive. At a few dollars for the part, replacing it at the first doubt is the fastest fix.
Can a neon run without a starter?
A classic fluorescent tube cannot light without a starter, unless the fixture uses an electronic ballast that handles ignition itself. LED retrofit tubes, by contrast, skip the starter: they ship with a dummy fuse to insert in its place, or they work after ballast bypass depending on the model. Decorative silicone-tube LED neon never needed a starter: its diodes light instantly at 12V, with no ignition, no flicker, and no wear part to monitor.
When should you replace a neon starter?
Replace the starter at the first signs of hard ignition: long blinking at startup, a tube that takes several seconds to start, or ends that glow red without the light stabilizing. The starter is a wear part that dies well before the tube, because its internal contact fatigues on every start. Many electricians replace it by default whenever they change the tube, so the whole cycle starts fresh. The part costs a few dollars and swaps in about a minute, power off, with a simple quarter turn.
Why does my neon still blink with a new starter?
If blinking continues with a new starter matched to the tube rating, the cause is elsewhere. Check the tube first: blackened ends mean it is spent, and a new tube will fix it. If blinking continues with both a new tube and a new starter, the ballast is likely tired, and replacing it needs electrical skill. Also check the tube contacts in the sockets, which can be oxidized or loose. If you are unsure about a line-voltage circuit, call an electrician rather than improvising.
Testing a neon starter is a simple habit that saves most failed fluorescent tubes. But if your neon keeps failing, the real upgrade is LED neon: instant on, zero starter, zero upkeep, and 100,000 hours of light. To create your custom piece with a 3-year warranty, start your project on our contact page and get a free 3D mockup within 24 hours.
Your custom neon, designed for free in 24 h
- Describe your ideaA text, a logo or a simple sketch. It takes one minute.
- Get your mockup and priceWithin 24 h by email, no commitment.
- Approve, we make itFree express delivery in 7 to 10 days, set up in 3 minutes.
- Mockup and price within 24 h, no commitment
- Free express delivery, received in 7 to 10 days
- 3-year warranty, set up in 3 minutes
Get your free mockup

Guillaume Schlupp
Founder of Helioneon
Over 10 years of entrepreneurship in premium interior design. 500+ LED neons delivered across 13 countries under Helioneon and Light Genius. Leads product strategy, design and professional accounts.