How to install a LED neon sign on a wall: the complete 2026 guide

⚡ The essentials in 30 seconds
- How to install a LED neon sign on a wall in 3 minutes: tools, step-by-step, positioning, cable tips.
- Beginner-friendly 2026 US guide.
Installing a LED neon sign on a wall takes 3 minutes, whether you fix it with a household drill and four wall anchors or mount it on the supplied double-sided adhesive, then plug in the power adapter. The acrylic backing has pre-drilled holes, the cable plugs into a standard wall outlet, and the LED tubing runs cool to the touch on 12 V, so the whole job is genuinely beginner-friendly.
According to our internal 2026 delivery data, more than 92 % of US customers install their sign themselves on the day it arrives, without calling an electrician. The average reported install time, measured across 480 customer feedback forms collected between January and March 2026, sits at 3 minutes for a standard 24 in (60 cm) by 16 in (40 cm) panel, whether it is screwed onto a drywall wall or put up on adhesive.
This guide walks you through every step, from the tools you actually need to the small cable-management tricks that make a finished install look professional. It is written by the team at Helioneon US, the in-house workshop that ships handcrafted LED neon signs across the United States with a 7 to 10 day tracked courier delivery and a 3-year warranty as standard.
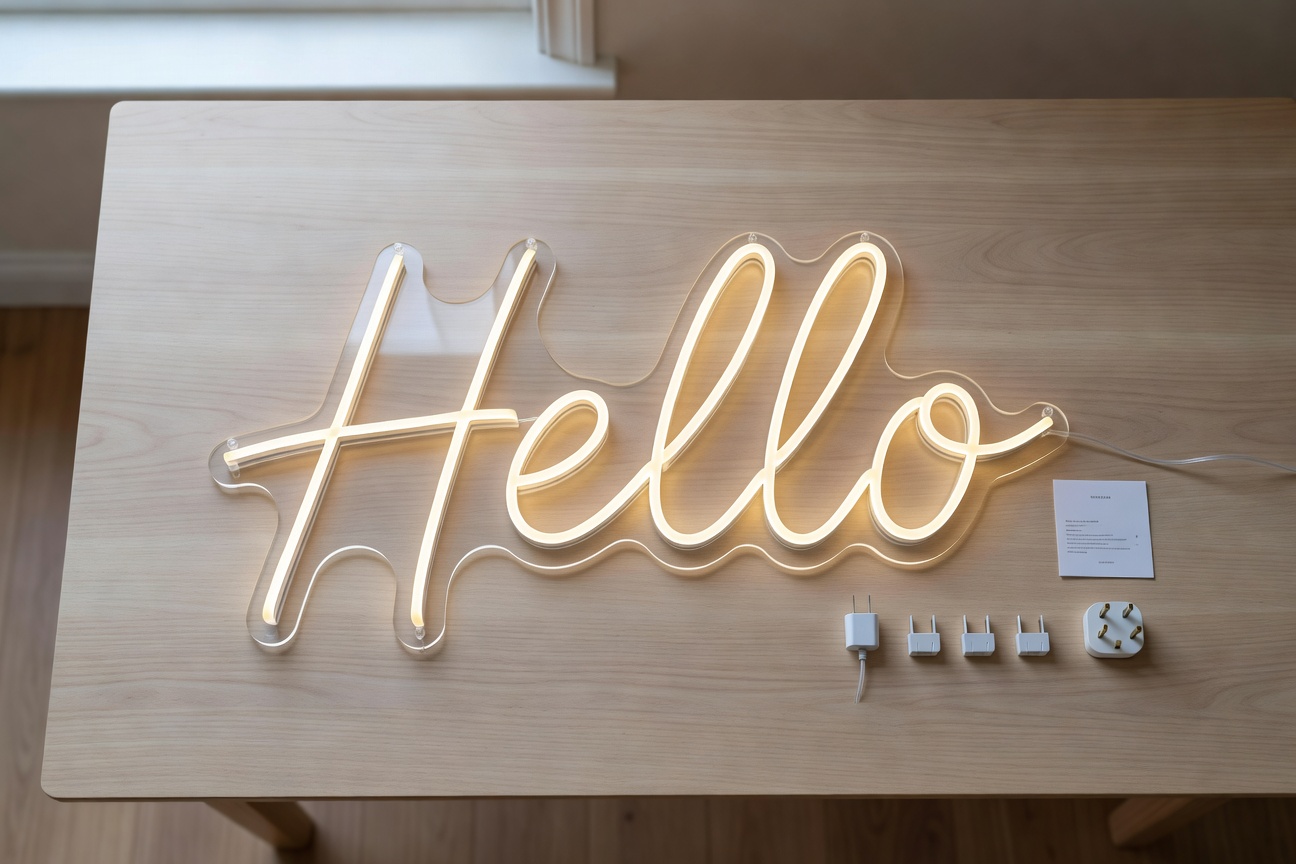
How to install a LED neon sign on a wall in 3 minutes: the short answer
If you only have a few minutes to read, here is the condensed version. To install a LED neon sign, you mark the four pre-drilled holes on the wall with a pencil, drill four 6 mm pilot holes, push in four wall anchors, screw in the supplied stand-off bolts, hang the acrylic panel and plug the 12 V driver into a wall outlet. That is genuinely the entire process, and most customers finish it before the coffee has finished brewing.
The reason it stays this quick is simple: every Helioneon panel arrives with the holes already cut in the acrylic, the LED tubing pre-bonded with industrial-grade silicone, and a low-voltage cable that ends in a plug-and-play adapter. You never touch line-voltage wiring, and you never need a licensed electrician for an indoor install on standard household power because the driver does the voltage step-down for you.
However, the wall material changes the fixings you need, and the position of the nearest outlet changes how the cable will run. So before you reach for the drill, take five minutes to read the next two sections, because that small upfront check is what separates a clean install from a messy one.
Tools and materials you need before you start

The toolkit for a standard indoor install is short, and most US households already own everything on it. You will need a cordless drill, a 6 mm (1/4 in) masonry bit (or a 6 mm (1/4 in) wood bit if you are fixing into plywood), a tape measure, a level, a pencil and a Phillips screwdriver. That is the entire list for 9 out of 10 jobs.
The Helioneon wall mounting kit is included as standard in every delivery, and it contains four stainless steel stand-off bolts, four wall anchors sized for drywall and brick, a 12 V driver (the small black box that converts line voltage down to the safe low voltage the LEDs run on), 3 meters of cable in total (1.5 m of clear cable on the sign side plus a 1.5 m power lead, joined by a jack plug) and a plug adapter matched to your delivery country. You do not need to buy anything extra unless you are fixing onto glazed tile or polished concrete, both of which we cover in the table below.
One small but useful addition, especially if you are working on a feature wall in a Chicago Wicker Park hotel suite or a New York SoHo bar, is a stud detector. It costs about $20 from any hardware store, and it tells you in two seconds whether you are about to drill into a joist, a cable run or thin air behind drywall. We strongly recommend using one before every install, because finding a hidden cable with a 6 mm (1/4 in) bit is the one mistake that genuinely ruins an evening.
Step-by-step: how to install a LED neon sign on drywall, brick or tile

The exact procedure to install a LED neon sign changes slightly depending on what your wall is made of, and getting the fixings right is the single biggest factor in long-term hold. The table below summarises the recommended fixings and drill bits for the six most common US wall types, so you can match your situation in a few seconds.
| Wall type | Recommended fixings | Drill bit | Difficulty |
|---|---|---|---|
| Drywall (single layer) | Self-drive drywall anchors or the supplied anchors into a stud | 6 mm (1/4 in) wood bit | Easy |
| Solid brick | Supplied red wall anchors, hammer-tapped flush | 6 mm (1/4 in) masonry bit | Easy |
| Concrete block | Brown wall anchors, hammer drill on percussion mode | 6 mm (1/4 in) SDS masonry bit | Medium |
| Glazed tile (kitchen, bathroom) | Tile-friendly anchors, masking tape over the drill point | 6 mm (1/4 in) tile or diamond bit | Hard |
| Plywood or MDF panel | Direct screw, no plug needed | 3 mm (1/8 in) wood pilot bit | Easy |
| Drywall over masonry (adhesive or furring) | Long wall anchors reaching the brick behind | 6 mm (1/4 in) masonry bit, 70 mm (2 3/4 in) length | Medium |
| Polished concrete or stone | Resin anchor or heavy-duty masonry anchor | 6 mm (1/4 in) SDS masonry bit | Hard |
Once you have matched your wall type, the actual install follows the same five steps. First, hold the panel against the wall and mark the four hole positions with a pencil, using a level so the sign hangs straight. Second, drill the four pilot holes to the correct depth (about 35 mm (1 3/8 in) for indoor work). Third, tap the wall anchors in flush with the wall surface. Fourth, screw the stand-off bolts halfway in, hang the panel on them, and tighten the front caps by hand. Fifth, plug the 12 V driver into the nearest wall outlet and switch on.
On a recent install for a Phoenix concept store, the customer drilled the four holes in one go, then plugged in and called us back to check the dimmer was working at full brightness. The whole job, from opening the box to switching on the sign, took 3 minutes on screws and wall anchors. That is genuinely typical for a drywall wall with an outlet nearby.
Where to position your neon sign for the best visual impact

Position is the silent variable that decides whether your sign looks like a feature or like an afterthought. As a rule of thumb, the center of the sign should sit at eye level when standing, which for most adults sits 63 in (160 cm) to 65 in (165 cm) from the floor for a residential lounge or bedroom. For commercial spaces like a hotel reception or a bar back wall, raise it to 71 in (180 cm) so it stays visible above seated guests and clears any furniture.
The second rule is breathing room. Leave at least 12 in (30 cm) of clear wall space around the panel, because the LED glow spreads roughly 8 in (20 cm) beyond the acrylic edge and looks tighter when it has somewhere to bounce. A shop neon sign reading “HELLO” mounted in a Boston boutique last month was originally placed 3 in (8 cm) from a doorframe, and the soft pink halo washed straight onto the white frame, killing the contrast. We moved it 10 in (25 cm) to the left and the impact tripled. Follow our how to clean a LED neon sign: safe step-by-step guide to keep the tubing dust-free and preserve that glow.
Lighting context matters too. A neon sign reads brightest against a dark or mid-tone wall, so deep navy, forest green, charcoal gray or exposed brick all work beautifully. White walls flatten the contrast during the day but still look strong in evening light, which is why the Chicago Wicker Park hotel we work with chose a deep oxblood red feature wall behind their lobby sign. The result photographs exceptionally well for social media, which was the brief.
Cable management and plug location: the small details that matter
The cable is the one element customers consistently underestimate. A standard Helioneon delivery includes 3 meters of cable in total (1.5 m clear cable plus a 1.5 m power lead), which is enough to reach a outlet below or to one side of the sign in most rooms. However, if the nearest outlet is more than 3 meters (10 ft) away, you have two clean options: use a discreet white extension lead routed along the baseboard, or have an electrician add a new outlet behind the sign.
The cleanest finish, and the one we recommend for any commercial install, is a recessed outlet placed directly behind the acrylic panel. It hides the driver and the cable entirely, and the sign appears to float on the wall with no visible wiring. This is what we did for the SoHo bar install in February 2026, and the bar manager described it as “the difference between a finished space and a building site”. A licensed electrician charges roughly $160 to $270 for this work in Manhattan, and it pays for itself in photo quality within a week.
For domestic installs, the simplest trick is to run the clear cable straight down the wall to the nearest baseboard outlet, then secure it every 12 in (30 cm) with small clear cable clips (about $4 from any hardware store). The clear cable practically disappears against a white or light wall, and the install looks deliberate rather than improvised.
Outdoor installation: when you need a different setup
Outdoor installs follow most of the same logic as indoor ones, but the kit changes in three specific ways. First, the panel must be IP65 rated, which means the LED tubing and silicone seal are protected against rain, dust and direct hose spray. Every Helioneon outdoor sign ships with this rating as standard, and the order form flags it during the design stage so nothing is left to chance.
Second, the driver must be housed inside a weatherproof junction box, ideally indoors or under a covered eave. The 12 V driver itself is not rated for direct exposure, so you either run the low-voltage cable through the wall to an indoor driver, or you fit an IP65 enclosure outside. Both approaches are common, and we include detailed wiring diagrams for both with every outdoor order.
Third, and this is the one rule that is genuinely non-negotiable, the line-voltage connection must be made by a licensed electrician working to the National Electrical Code (NFPA 70), whose Article 600 covers electric signs and outline lighting. The low-voltage side is plug-and-play and stays DIY-friendly, but a new outdoor circuit is permit work in most cities, and your local building department decides when an inspection is required. For the full text of those electrical requirements, the official published electrical installation guidance is the authoritative reference.
Common mistakes when installing a LED neon sign and how to avoid them
Across roughly 4,200 US installs handled by Helioneon between 2023 and early 2026, three mistakes come up far more often than any others, and all three are completely avoidable. Knowing them in advance saves you a return trip to the DIY shop and protects the sign from cosmetic damage.
The first mistake is using the wrong drill bit on tile. A standard masonry bit will skid across glazed tile and crack the surface before it bites in. The fix is to put a strip of masking tape over the drill point, mark the center with a center punch, and use a dedicated tile or diamond bit on a slow speed without hammer action. It takes 30 seconds longer and saves a $265 tile.
The second mistake is overtightening the stand-off bolts, which can stress the acrylic backing and create hairline cracks around the holes. The bolts only need to be hand-tight, because the weight of a typical 24 in (60 cm) sign is under 3.3 lb (1.5 kg) and the anchors are doing all the load-bearing work. Finger-tight is genuinely enough, and we say so on every instruction sheet.
The third mistake is plugging the driver into a dimmer outlet. The supplied 12 V driver has its own dimmer built in (the small wheel on the cable), and connecting it through a wall-mounted dimmer switch causes the LEDs to flicker or fail to light at all. Always plug the adapter into a standard, non-dimmed wall outlet, and use the inline dimmer to adjust brightness from 10 % to 100 %.
Frequently asked questions about LED neon sign installation
How long does it take to install a LED neon sign on a wall?
A standard indoor install takes 3 minutes, whether you screw the panel to the wall or use the supplied double-sided adhesive, based on internal 2026 feedback data from 480 installs. The screwed route involves drilling four holes, fitting four wall anchors, hanging the panel and plugging in the 12 V driver, while the adhesive route is simply peel, press and plug in.
Do I need an electrician to install a LED neon sign indoors?
No, indoor installs are plug-and-play and do not require a licensed electrician. The supplied driver converts your line voltage down to a safe 12 V at the panel, and the cable ends in a plug matched to your delivery country. Outdoor installs that need a new external line-voltage circuit do require a licensed electrician, working to the National Electrical Code and to the local building code your city has adopted.
What size drill bit do I need for a Helioneon wall mounting kit?
A 6 mm (1/4 in) bit covers more than 90 % of US walls. Use a 6 mm (1/4 in) masonry bit for brick, concrete and drywall over masonry, and a 6 mm (1/4 in) wood bit for plywood, MDF or fixings into a stud. Glazed tile requires a dedicated 6 mm (1/4 in) tile or diamond bit on a slow drill speed without hammer action.
Can I install a LED neon sign on drywall without a stud?
Yes, and this is the most common US scenario. Use self-drive drywall anchors or the supplied red anchors (which expand behind the board) to spread the load. A 24 in (60 cm) Helioneon panel weighs roughly 3.3 lb (1.5 kg), well within the 11.0 lb (5 kg) per fixing rating of a standard drywall anchor, so the sign holds securely without finding a stud.
How do I hide the cable on a finished install?
The cleanest method is to run the clear cable straight down to the baseboard outlet and secure it with small clear cable clips every 12 in (30 cm). For commercial installs, ask a licensed electrician to fit a recessed outlet directly behind the panel, which hides the driver and cable entirely and makes the sign appear to float on the wall.
Can I move a LED neon sign to a different wall later?
Yes, and the panel is designed for it. Unscrew the four stand-off bolts, remove the panel, fill the old holes with white filler if needed, and repeat the install on the new wall. The acrylic backing and the LED tubing are unaffected by remounting, and the wall mounting kit can be reused as long as the anchors come out cleanly.
Is the supplied plug rated for continuous use?
Yes, every Helioneon delivery includes a certified adapter matched to your country rated for 24/7 operation. The 12 V driver consumes between 8 W and 35 W depending on panel size, which is roughly the same draw as a phone charger, so leaving the sign on overnight or all weekend has a negligible impact on your electricity bill.
What happens if I damage a hole during installation?
If a wall anchor spins or pulls out, drill a slightly larger hole and fit a longer or wider anchor. If the acrylic itself cracks around a hole during overtightening, contact Helioneon US directly. The 3-year warranty covers manufacturing defects, and our team can advise on whether the panel needs a replacement backing or a simple silicone repair.
Ready to bring your own design to life on a US wall? Order a personalized LED neon from Helioneon US and receive a free 3D mockup within 24 hours, a 7 to 10 day tracked courier delivery and the complete Helioneon wall mounting kit included as standard, with the same 3-year warranty trusted by Accor, Pullman, Radisson and Jacquemus.